
One important step in making sure you’re safe when riding is mounting a safety light on your bike’s cargo, especially when you are riding during low-light or night conditions. Knowing how to attach a safety light to a bike cargo is crucial for both your safety and the safety of others on the road. A safety light not only makes you visible to other drivers but also helps you to navigate through dark areas with ease. When carrying cargo on your bicycle, securing the light accordingly is crucial to provide adequate lighting.
In this content, we shall walk you through mounting a safety light on your bike cargo, giving you step-by-step instructions on placement, securing the light, and maintenance advice so you can have prolonged use.
2. Why You Should Get a Safety Light on Your Bike Cargo
Commuting, chores, or evening ride, getting a safety light mounted on your bike cargo can make a big difference in your visibility and also prevent accidents. Bike lights are important to alert drivers and pedestrians of your presence and minimize the risk of accidents in low-visibility conditions.
A safety light is particularly necessary when carrying a load since the extra weight makes your bike less conspicuous from behind or sides. By making sure your bike cargo has an operating safety light, you’re increasing both your safety and the safety of other drivers, especially during bad weather or in the evening.
3. Safety Light Options for Bike Cargo
When you are choosing a safety light for application with your cargo bike, there are many to choose from, and each has its characteristics and advantages. Understanding the types can help guide you in selecting the most suitable for your application.
LED Lights
LED lights are energy-efficient, long-burning, and bright, so one of the most popular choices for bike safety lights. LED lights are designed to be super-reflective in any condition, so you’ll be seen from miles away.
Reflective Lights
Reflective lights don’t emit light but reflect external light sources, such as car headlights. They’re simple, low-maintenance, and cheap, though not active light like LEDs.
Clip-on Lights
Clip-on lights are easy and convenient to clip to your bike cargo. They offer the versatility of where to place them and typically use batteries. Clip-on lights can be easily pulled off and are an ideal option for cyclists who must take their lights inside when they are not being used.
4. Choosing the Right Safety Light for Your Bike Cargo
Choosing the right safety light depends on your personal needs, such as battery life, brightness, and mounting. If you will be riding great distances, you will want a light with greater battery life so you don’t experience failure in the middle of a ride.
Brightness is also important—ensure that the light is bright enough to be visible from a distance, particularly in city conditions with heavy traffic. It should also be considered where to mount the options, as some lights require a particular mount, i.e., clip-on, Velcro straps, or mounting brackets. Consider your riding conditions and choose one that maximizes visibility and durability.
5. Step-by-Step Guide: How to Attach a Safety Light to a Bike Cargo
Just follow these easy step-by-step instructions to install a safety light on your bike cargo safely, so that you can enjoy a safe and smooth ride.
Tools and Materials You’ll Need
First, gather the universal tools like screwdrivers, zip ties, or clamps, depending on the model of light. You will also need to choose the right safety light based on the cargo configuration of your bike, e.g., a clip-on for side bags or a mounted LED for cargo in the rear.
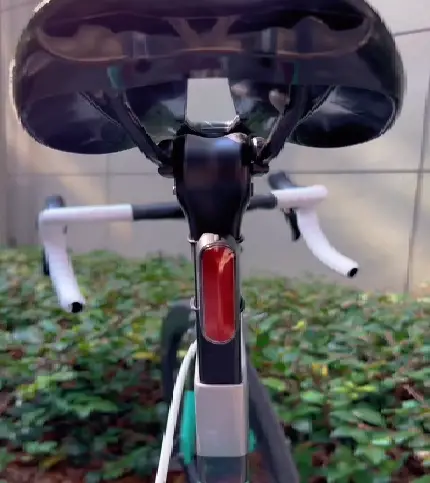
Where to Mount the Safety Light
The most common spots to mount a safety light include the rear of the cargo or side bags. On the rear will ensure you are seen by vehicles approaching from behind. If your cargo has side panniers, you should mount one light on each side for additional lateral visibility.
How to Mount the Light
Securing the light will depend on the type of mounting available from the light. Some will strap to your cargo, and others will mount by Velcro straps, zip ties, or brackets. Make sure the light is firmly mounted so that it does not move or come loose on your ride.
Adjusting the Light for Maximum Visibility
Once the light is mounted, position its angle and intensity such that it can be seen from afar. For rear lights, project the light upwards slightly to achieve maximum visibility without dazzling other drivers or bikers.
6. Maintenance Tips of Safety Light
Proper maintenance of your safety light ensures proper and long-lasting performance.
Regular Inspection
Inspect your safety light regularly for signs of wear or damage. Inspect the casing of the light, battery compartment, and mounting points to ensure that they are in good condition. Inspect for cracks, loose parts, or poor connections that could affect its functionality.
Battery Maintenance
If your light is battery operated, make sure the batteries are charged or replaced when necessary. Rechargeable batteries need to be recharged periodically, and disposable batteries need to be replaced when they indicate decreased brightness. Always have spare batteries in case of longer trips.
7. Mistakes to Avoid When Securing a Safety Light
In order for your safety light to operate as designed, don’t make these common mistakes that may impair its performance.
Incorrect Placement
Incorrect positioning of the light, for instance, too low or obstructed by cargo, may reduce its visibility. Place the light at a specific height and angle in a location where other road users would also see it from afar.
Using Low-Quality Lights
Low-quality lights tend to be less long-lasting, provide poor illumination, or have reduced battery life, reducing their efficiency. Purchase a good-quality, reliable safety light that will optimize visibility and safety on your rides.
Forgetting to Replace Batteries
One of the most common mistakes is not replacing or recharging batteries in a timely manner. Check the power of your light before each ride and replace batteries or charge the light to avoid instantaneous power drain.
FAQ’s
1. How do I install a safety light on my bike cargo?
To install a safety light, choose a good place on your cargo, such as the back or side. Secure it with mounting straps, zip ties, or clips, depending on the shape of your light, to keep it securely in place.
2. What would be the most appropriate type of safety light for bike cargo?
LED safety lights are highly recommended for bike cargo as they are bright, energy-efficient, and simple to install. Reflective lights may be used, but they are less visible than LED lights.
3. Where do I install the safety light on my bike cargo?
It’s best to place the safety light behind the cargo for maximum visibility. You can also install it on the side if you’re using side panniers or bags.
4. Can I use any safety light on my bike cargo?
No, ensure the safety light is meant for bike use, is sturdy enough for outdoor conditions, and fits the shape and size of your cargo.
5. How do I maintain my safety light for my bike cargo?
Check the light periodically for damage or wear. Keep batteries charged and replace them when they need it to receive the best performance.
6. What if my safety light doesn’t work?
First, check the batteries and replace them if dead. If the light still does not work, check for physical damage and replace the light if needed.
Conclusion
Properly mounting a safety light on your cargo bike, you not only become more visible but also help to ensure a safer experience for both yourself and other road drivers. Safety lights are crucial for visibility, especially during night driving, and also provide reassurance while riding during nighttime or in fog. Spend time to fit and maintain your safety light on your bike, and it will keep you in sight, prevent accidents, and make your journey safer and more enjoyable.

I am Ryan Ford, a mountain biking enthusiast who loves to explore the outdoors. I also like to go on adventures with friends and anything else that involves being outside. I love my bike because it gets me out of the house and gives me an opportunity to enjoy nature.