
Bleeding mountain bike brakes is routine maintenance that keeps your brakes operating at their peak, with safety and consistency in rides. Air and water can invade the brake lines over time, causing the brakes to become spongy or unresponsive.
Knowing how to bleed mountain bike brakes properly helps eliminate these issues, restoring smooth and consistent stopping power. This is something you can do at home with the right equipment and a bit of patience. With the correct procedures, you can maintain the braking system of your bike in great working condition and be confident to ride on any terrain.
2. Why is Bleeding Mountain Bike Brakes Important?
It’s important to understand why it’s so important to bleed your mountain bike brakes so that you are able to have consistent stopping power and prevent potential safety issues when riding. Air and water seep into the brake lines with time, affecting the hydraulic system. The brake feel becomes soft or decreases in braking potential, putting your safety on technical trails or steep slopes at risk.
Bleeding brakes expels air and water, which keeps brake performance optimal. Proper brake fluid levels and hydraulic line cleaning also prevent wear on the brake system, add longevity and keep you safe for every ride.
3. Tools You Will Need to Bleed Brakes
Prior to beginning the brake bleeding process, it will be wise to have the right tools ready in a bid to make it easy and stress-free. Here is a list of tools which you will require:
- Brake fluid (DOT or mineral oil): You can use either DOT fluid or mineral oil, depending on your brake system. Consult your owner’s manual to employ the appropriate type.
- Brake bleeding kit: This kit has syringes, hoses, and fittings that enable you to push out the old fluid and prevent air from entering the brake lines.
- Allen wrenches: These shall be utilized in removing and adjusting the brake components, such as the caliper or lever.
- A container for fluids: A container shall be used in catching the old brake fluid during bleeding.
- Cleaning materials: You will need clean rags or paper towels to clean excess brake fluid and prevent spilling on your bike or surrounding area.
4. Step-by-Step Guide to Bleeding Mountain Bike Brakes
Here is the step-by-step, detailed guide to help you bleed your mountain bike brakes and have them working like new.
Step 1: Set Up Bike and Workspace: Start by removing the wheel so that you can have easy access to the brake system. Clean up your workspace and keep it dry to avoid contaminating the brake parts.
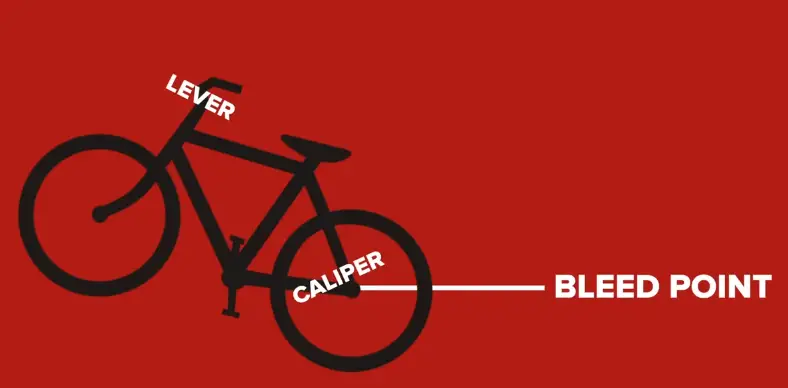
Step 2: Install the Bleeding Kit: Place the bleeding kit on your caliper or brake lever, and make sure that it is all securely installed. Check for loose fittings or leaks before proceeding.
Step 3: Open the Brake Bleed Valve: Locate the brake caliper or lever’s bleed valve, and open it slowly with your Allen wrench. Allow the fluid to drain slowly as you prepare yourself for the next step.
Step 4: Add the Brake Fluid: Fill the system with new brake fluid using the syringe, pouring it in slowly until it flows freely from the valve.
Step 5: Pump and Flush Old Fluid: Slowly push the brake lever to pressurize old fluid out. Keep flushing until clean fluid issues from the valve.
Step 6: Close Bleed Valve: Once the old fluid is purged, close the bleed valve firmly to prevent leaks and allow air into the brake system.
Step 7: Check the Brakes: Reinstall the wheel, and inspect the brake lever for proper feel and sensitivity. Make sure the brakes are engaging smoothly and safely.
5. Five Common Mistakes to Avoid When Bleeding Brakes
Bleeding brakes can be a breeze, but there are a few common mistakes that will make the process a hassle or ruin your bike’s braking system.
- Using the wrong brake fluid: Always check the manufacturer’s instructions and use the correct type of brake fluid. Using the incorrect fluid can harm the brake system’s components and seals.
- Over-tightening the bleed valve: While securing the bleed valve is crucial, over-tightening the valve can cause the valve to be damaged or strip the threads and lead to leaks or failure.
- Not properly locking the brake caliper: If the brake caliper is not locked when bleeding, it will either shift or cause leakage, making the brake system ineffective.
6. How to Maintain Your Brakes in Condition After Bleeding
Having bled your brakes successfully, it is then important to look after them well so that they remain in good condition for future rides.
- Brake checks in frequency: It is a good practice to inspect your brakes before each ride, examining the brake pads, rotors, and fluid levels in an attempt to identify any emerging problems early.
- Cleaning of brake components: Keep the brake system clean by wiping rotors and calipers regularly to prevent dirt buildup that could compromise braking.
- Replacing worn-out brake pads: Brake pads deteriorate with use. Replace them when they are worn down to maintain maximum stopping power and prevent warping the rotor.
7. How Often Should You Bleed Mountain Bike Brakes?
How frequently to bleed brakes depends on how you ride and the conditions, but knowing when a brake bleed is in order is vital to maintaining performance. A once-a-year rule of thumb works, but more frequent bleeds are warranted if you ride in wet conditions or consistently ride your brakes to the extreme on aggressive terrain.
Also, if your braking ability is lost or you have spongy lever feel, it is likely the time to bleed the brakes. It’s a good idea to monitor your brake fluid level and brake performance regularly so you can detect a problem before it gets bad enough to do damage.
8. Signs You Need to Bleed Your Brakes
Some symptoms will make you aware that you need to bleed your mountain bike brakes to restore them to operation.
- Soft or spongy brake lever return: If your brake lever feels soft or spongy, air may have infiltrated the hydraulic system and decreased its performance.
- Lack of unresponsive braking power: When you feel like there is no power or that there’s an irregular return when you pull your brake lever, it may be that your brake system requires service.
- Leaking brake fluid: If you notice fluid leaking where the brake calipers or levers are, it is crucial that you bleed the brakes right away so that system failure or safety hazards do not occur.
FAQ’s
How often do I need to bleed my mountain bike brakes?
Bleeding needs to be done every 1-2 years or when you notice poor brake performance or spongy brake levers. The frequency can vary with the type of riding.
What is the best fluid for mountain bike brakes?
Best fluid depends on your brake system: use DOT fluid with hydraulic disc brakes designed for DOT fluid, and mineral oil with others. Always consult your bike’s manual for detailed instructions.
Why are my mountain bike brakes spongy following bleeding?
If your brakes feel spongy, air may still be trapped in the brake line. Make sure to pump the lever thoroughly and check the system for leaks.
Can I bleed mountain bike brakes without a kit?
While it’s possible to do it, we suggest using a brake bleeding kit for accuracy and convenience. It will ensure that all the air is purged out and brake system is fully bled.
What if I use the wrong brake fluid?
Using the wrong fluid can destroy your brake system’s seals and components and could cause brake failure. You always need to use the proper type of fluid for your brakes.
Can I bleed brakes without removing the wheel?
Yes, you can indeed bleed brakes without removing the wheel, but it might be easier with the wheel off. Refer to your brake manufacturer’s guidelines for best results.
How do I know that I need to replace my brake pads after bleeding?
If you still experience poor braking performance after bleeding your brakes, or if your brake pads are worn out, it is time to replace them for optimal performance.
Conclusion
Brake bleeding on mountain bikes is a fairly easy process that can significantly improve your ride’s effectiveness and safety and allow you to confidently traverse the trails. Daily brake upkeep prevents safety issues and will save you repair costs later on. Correct bleeding procedures guarantee that your brakes will work rapidly and reliably under any circumstances. Maintenance and rapid response can be the difference between a good or a bad ride, so keep your brakes in top form before you hit the trail.

I am Ryan Ford, a mountain biking enthusiast who loves to explore the outdoors. I also like to go on adventures with friends and anything else that involves being outside. I love my bike because it gets me out of the house and gives me an opportunity to enjoy nature.