
Mountain biking has changed with tubeless technology. It brings better performance, more resistance to punctures, and less weight. To enjoy these benefits, you need to learn how to go tubeless on your mountain bike. A tubeless tire setup means a smoother ride and more protection against punctures.
Switching to tubeless offers many advantages. You get better grip, more resistance to punctures, and less rolling resistance. The cost to start is low, but you need to keep it up for it to work well. Knowing how to set up and maintain your tubeless tires is key for the best ride.
Key Takeaways
- Tubeless setups offer increased grip and better puncture resistance
- A mountain bike tubeless setup requires regular servicing to maintain efficiency
- Learning how to go tubeless mtb is essential for a smoother ride and better performance
- A tubeless tire set up allows for lower tire pressures without compromising puncture resistance
- Understanding how to set up a tubeless tire and perform routine maintenance is crucial for optimal performance
- Tubeless technology has revolutionized the mountain bike world, offering improved performance and weight savings
- Converting to a tubeless setup can be done with the right tools and knowledge, using a tubeless-ready tire and specific sealant
Benefits of Converting to Tubeless MTB Tires
Switching to tubeless mtb tires brings many advantages. You get better traction and control, and they protect against punctures. Plus, you can run your tires at lower pressures. These benefits make mountain biking more enjoyable.
Tubeless tires seal punctures quickly with sealant. This means you can keep riding without worrying about flats.
Some key benefits of tubeless mtb tires are:
- Lower tire pressures for better grip and comfort
- Less chance of getting a flat, thanks to sealant
- More control and confidence on the bike
Finding the right tire pressure is crucial. Lower pressures improve grip but can damage rims. Sealant helps manage this risk, letting you enjoy lower pressures safely.
Tubeless tires also enhance performance and handling. They allow for lower pressures, making rides more comfortable and controlled. This is perfect for mountain biking. Overall, going tubeless is a smart choice for mountain bikers wanting a better ride.
Essential Tools and Materials for Tubeless Conversion
To set up tubeless successfully, you need the right tools and materials. Start with a tubeless conversion kit. It usually has a valve stem, rim tape, and sealant. Choose a tubeless valve stem that fits your rim and desired length.
Having the right rim and tire is also key. Your rim must be tubeless-compatible, and your tire should be ready for tubeless use. Brands like this make it easier to find the right pair.
Quality sealant is crucial for a good tubeless setup. The amount needed varies by tire size. For a 27.5 x 2.25-inch tire, use about 150ml of sealant.
- Tubeless conversion kit
- Tubeless valve stem
- Rim tape (available in widths from 21mm to 39mm)
- Sealant (standard or race sealant, depending on your needs)
- Compatible rim and tire
With the right tools and materials, you’re ready for a successful tubeless conversion. Always follow the manufacturer’s instructions and be careful with sealant and other materials.
| Tool/Material | Description |
|---|---|
| Tubeless conversion kit | Includes tubeless valve stem, rim tape, and sealant |
| Tubeless valve stem | Designed for tubeless use, available in different lengths |
| Rim tape | Available in widths from 21mm to 39mm, used to seal the rim |
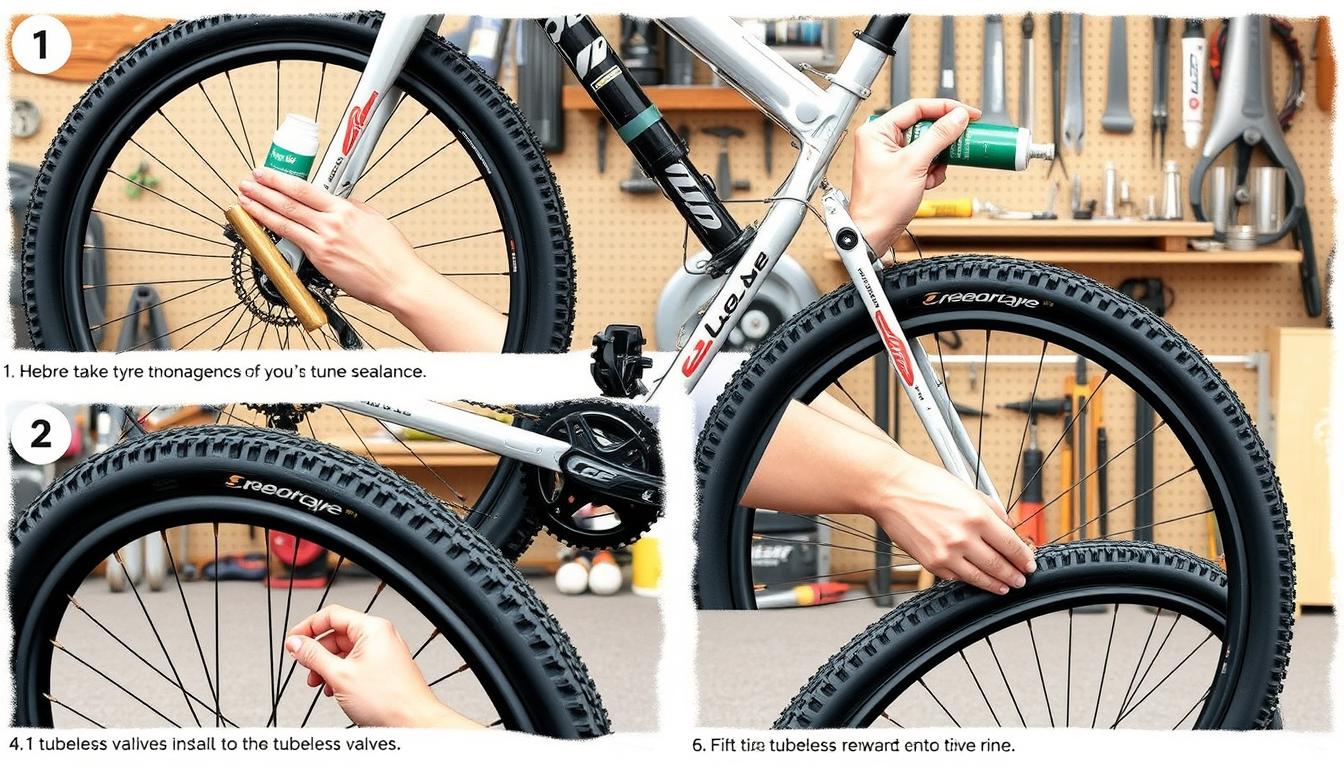
How to Go Tubeless MTB: Step-by-Step Process

To set up a tubeless tire, follow a simple step-by-step guide. First, check if your tires and rims are compatible. Then, install tubeless valve stems, apply rim tape, and mount the tires. This process takes about 15-30 minutes per tire.
It’s important to make sure your tires and rims match. Most modern tires and rims are ready for tubeless use. When setting up, use two layers of rim tape for a snug fit.
- Check tire and rim compatibility
- Install tubeless valve stems
- Apply rim tape
- Mount tubeless-ready tires
By following these steps and using the right parts, you’ll enjoy better traction and protection against punctures. Setting up your bike for tubeless riding is simpler than you might think. With the right help, you can do it quickly and easily.
Choosing the Right Tubeless Tire Sealant

Choosing the right tubeless tire sealant is key to enjoying tubeless mtb. There are many types of sealants out there. It’s important to pick one that fits your needs. The web suggests using a non-porous tape to keep liquid out, ensuring a good tubeless setup.
Popular sealants include Stan’s Race Sealant, Muc-Off No Puncture Hassle Sealant, and Orange Seal Endurance sealant. Stan’s Race Sealant is top-rated for sealing big holes. The amount needed depends on tire size, with 27.5in tires needing 75-90ml and 29in tires needing 75-95ml.
Different Types of Sealants
There are many types of sealants, like race sealant for big holes and endurance sealant for long-lasting protection. Brands like Stan’s NoTubes, Orange Seal, Muc-Off, and Vittoria offer a variety. This makes it easier to find the perfect sealant for you.
How Much Sealant to Use
Using the right amount of sealant is crucial for a successful tubeless setup. For gravel tires up to 2.5 inches, use 2-3 ounces. For 2.7-2.8 inch mountain bike tires, use 3-4 ounces. It’s also important to check and top up sealant regularly. Lifespans range from two weeks to four months. By choosing the right sealant and using the correct amount, you’ll enjoy better traction, control, and protection against punctures.
Proper Tubeless Tire Inflation Techniques

Getting the right mtb tubeless tire pressure is key for a good tubeless setup. Use a high-volume pump for better airflow and to seat the tire right. Also, take out the valve core for easier inflation.
For tubeless tire maintenance, keep up with a regular check-up schedule. This means checking the tire pressure often and adjusting it when needed. Tubeless tires usually need 7-10 psi (0.5-0.7 bar) less than tires with tubes.
It’s also crucial to use the right amount of sealant and replace it on time. How often you need to replace it depends on the weather and tire pressure.
Some tips for proper inflation include using a valve core remover and a high-volume floor pump or air compressor. These tools help with a steady and efficient air flow. For race events, consider getting an air tank since resources might be limited.
By sticking to these tips and a regular tubeless tire maintenance schedule, you’ll get the most out of tubeless tires. They offer better traction and speed on rough terrains.
| Tire Size | Recommended Sealant Volume |
|---|---|
| 26″ | 2-3 oz |
| 27.5″ | 2.5-3.5 oz |
| 29″ | 3-4 oz |
By following these guidelines and using the right techniques, you can have a successful tubeless setup. Enjoy the perks of mtb tubeless tire pressure and tubeless tire maintenance.
Common Tubeless Setup Challenges

Converting to a tubeless setup can be tricky. Keeping your tubeless tire maintenance up is key to avoid air leaks and sealant issues. Seating issues, where the tire doesn’t fit right on the rim, are common. Warm, soapy water can help the tire seat properly.
Fixing air leaks is another hurdle, often due to a bad tubeless valve stem install. To tackle leaks, use a sealant to block gaps or holes. Remember to top up tubeless tire sealant regularly, depending on the environment and sealant type.
Here are some common problems and how to solve them:
- Seating issues: use warm, soapy water to help seat the tire casing
- Air leaks: use a sealant to fill in any gaps or holes in the tire or rim
- Sealant problems: refresh sealant levels periodically and use the correct type of sealant for the specific tire and rim
| Challenge | Solution |
|---|---|
| Seating issues | Use warm, soapy water to help seat the tire casing |
| Air leaks | Use a sealant to fill in any gaps or holes in the tire or rim |
| Sealant problems | Refresh sealant levels periodically and use the correct type of sealant for the specific tire and rim |
Maintaining Your Tubeless MTB Setup

Regular tubeless tire maintenance is key for a successful setup. It brings benefits like fewer punctures and a smoother ride. Always check tire pressure after setting it up and add sealant as needed.
Refreshing the sealant every three months is vital. The type of sealant and how often you ride affect how long it lasts. Use a cable tie to check sealant levels; more than a centimeter means it’s good.
Don’t forget to inspect the tire for cuts and the rim tape. Clean the valve core too. After adding sealant, inflate the tire and take a short ride. This lets the sealant coat the tire evenly.
Remember these maintenance tips:
- Check tire pressure often
- Refresh sealant every three months
- Look for tire cuts and damage
- Check rim tape and clean the valve core
Understanding Tubeless Tire Pressure for Different Terrain

Finding the right mtb tubeless tire pressure is key for mountain biking. It depends on tire width, thickness, rubber, diameter, and rim size. For riders with 2.4–2.5” tires and a 30 mm rim, start lower than the recommended pressure.
It’s wise to add 2-3 PSI to the rear tire to balance weight. But, the best pressure also depends on your weight, where you ride, and how you ride. For an 80kg rider in the UK, start with specific pressures for a trail bike. Add 5psi if using inner tubes to avoid punctures.
To find the perfect pressure, use a chart or ask a pro. The chart is based on Schwalbe’s Pressure Prof system. It helps find the best pressure for better riding, comfort, and protection against punctures.
| Tire Width | Internal Rim Width | Optimal Tire Pressure |
|---|---|---|
| 2.4-2.5″ | 30mm | 20-25psi |
| 2.6-2.8″ | 35mm | 18-22psi |
By following these tips and considering what affects mtb tubeless tire pressure, you can find the perfect pressure. This will enhance your mountain biking experience with how to go tubeless mtb.
When to Replace Tubeless MTB Tires and Components
Keeping your tubeless tire maintenance up to date is key for top performance and safety. It’s important to know when to swap out your MTB tires and parts. Look for signs like cracks, cuts, or worn-out tread.
Tubeless mtb tires offer better grip, protection from punctures, and lower pressure. But, they need regular care to keep these benefits. Always check your tires for damage or wear and replace them when needed.
Signs of Tire Wear
- Cracks or cuts in the tire sidewall or tread
- Excessive tread wear or bald spots
- Damage to the tire bead or rim
Don’t forget to check the valve stems and rim tape too. Look for any damage or corrosion on the valve stems. Also, replace the rim tape if it’s damaged or worn out.
Valve Stem Maintenance
Keeping your valve stems in good shape is crucial. Check for damage or corrosion and replace the valve cores if needed.
| Component | Replacement Interval |
|---|---|
| Tires | Every 2-3 years or when signs of wear are visible |
| Valve Stems | Every 1-2 years or when damaged |
| Rim Tape | Every 1-2 years or when damaged |
By sticking to these guidelines and doing regular tubeless tire maintenance, you can keep your MTB tires and parts in top shape. This ensures you get the most out of your benefits of tubeless mtb tires.
Cost Comparison: Tubes vs. Tubeless
Thinking about switching to tubeless? The cost is a big factor. A tubeless conversion kit is a big buy, but it’s worth it. Tubeless tires give better grip, fewer flats, and let you run tires softer.
Let’s look at the costs of tubes and tubeless setups:
| Component | Tubes | Tubeless |
|---|---|---|
| Tire | $20-$50 | $50-$100 |
| Rim Tape | N/A | $10-$20 |
| Valve Stems | N/A | $20-$50 |
| Sealant | N/A | $10-$20 |
Tubeless setups cost more upfront, but they save money in the long run. They also cut down on flats. For those wanting to go tubeless mtb, a conversion kit is a smart choice. It lets riders enjoy tubeless benefits without spending too much.
Conclusion
Thinking about switching to tubeless mtb? It’s key to know the pros and cons. Tubeless tires offer better grip, more resistance to punctures, and less weight. With the right tools and knowledge, riders can boost their mountain biking experience.
Experts say about 80% of tubeless tires resist small punctures well because of sealant. Riders find up to 70% fewer flats with tubeless tires than with traditional ones. Brands like Polygon offer top-notch tubeless-ready tires. Retailers like Rodalink make it easy to buy quality bikes with good prices and payment plans.
In short, tubeless mtb has many advantages like better grip, more resistance to flats, and less weight. By learning how to set up tubeless mtb and picking the right parts, riders can improve their biking. This makes for a better riding experience and performance.
I am Ryan Ford, a mountain biking enthusiast who loves to explore the outdoors. I also like to go on adventures with friends and anything else that involves being outside. I love my bike because it gets me out of the house and gives me an opportunity to enjoy nature.