
One of the most important parts of an mtb bike we overlooked is the handlebars. It dramatically affects our biking experience; it ensures better comfortability and improved performance and lowers the chance of back and neck pain while riding for a long time. Rising and lowering the handlebar will ensure a comfortable grip on the handlebars and better riding performance. Have a question in mind “can you raise the handlebars on a mountain bike, and if yes, then how to do that?
Let’s get started and learn more about raising the handlebars on modern mountain bikes.
Can You Raise The Handlebars On a Mountain Bike?
Yes, you can raise the handlebars on a mountain bike.
Bikes can be modified to fit your needs or style, which means that they can be customized to look like a BMX, a mountain bike, or a road bike. The parts that comprise these bikes can also be modified. And when you’re trying to find ways to customize your ride, the handlebars are one of the main things you want to take into consideration. Yes, you guessed me right; today I will discuss raising or lowering the bike handlebars with you.
Different Styles of Handlebars
Before we know how to raise the handlebars on a mountain bike, we must know which height and style of handlebars are suitable for a mountain bike.
Each handlebar is designed with a specific purpose.
Drop Handlebar:
The perfect height of a mountain bike handlebar should be a little lower than the saddle. It’s called a drop handlebar. This type of handlebar is designed for great griping and balancing on trails.
Flat Handlebar:
But when it’s a road bike, the seat and handlebar will be on the same point. It’s called the flat bars or flat handlebars that are designed for fast pedaling and not let your body feel sore in a long ride.
Cruiser Handlebar/Riser Handlebar:
A cruiser bike handlebar will be a little higher than the seat to provide maximum comfort and limit strain. It’s called the riser handlebar.
When You Need To Adjust The Handlebars
While doing mountain biking, we face some situations or problems due to handlebars. Because most of the mountain bike comes optimized in medium size. So no matter you are short or large, it’s not gonna fit you. You have to raise or lower the handlebars to put yourself in a comfortable position to ride them perfectly. But how to identify if handlebars really causing problems for you or not? Let’s know.
- If you are feeling lower back pain after or during a long bike journey, it’s a sign the handlebar isn’t in the right position. Handlebar height needs to be dropped a little than the sit position.
- The same goes for neck pain. Most of the riders face neck problems while on a long ride.
- Everything is going fine; the pedals are running smoothly, the gripping is perfect still, something is missing. The overall bike performance doesn’t have any improvement. Why so? It’s another sign your bike performance isn’t improving because the handlebar doesn’t let the body be in the best riding position and perform its best. You can give it a try by checking the handlebar is in the right position or not.
- Comfort is everything. If you don’t find yourself comfortable, you can’t enjoy the ride. The handlebar is a part of the bike; it also contributes to making the ride comfortable.
- The handlebar helps to extend the visibility of your bike. Along with this, you can observe every single turn on your way so that harm does not occur due less to distraction caused by an unwanted passer-by. It allows complete view around; it’s a kind of guideline for safe operation. So having it in the wrong position may disturb the visibility.
- You can make sure you are riding at the right speed by checking your handlebar position. The best is the rider who has the most comfortable grip on his hand, and this help to keep cheek muscle relaxed under all situations like no-hands mode (various condition of the difficult track such as windy), downhill, turning, etc.
How To Raise The Handlebars On a Mountain Bike
Don’t be afraid; it won’t take much time nor much equipment.
Before raising the handlebars, know them. There are two types of handlebars, threadless headset system, and threaded headset system. Another is available, adjusting the handlebar angle, but it’s rarely found. The threadless headset system comes with one big bolt on its top and two small bolts to clamp the stem down. And if the handlebar is connected with only one metal connection, it means it’s a threaded headset system. Here we will know about raising both handlebar systems.
Raising Handlebars With A Threadless Headset System
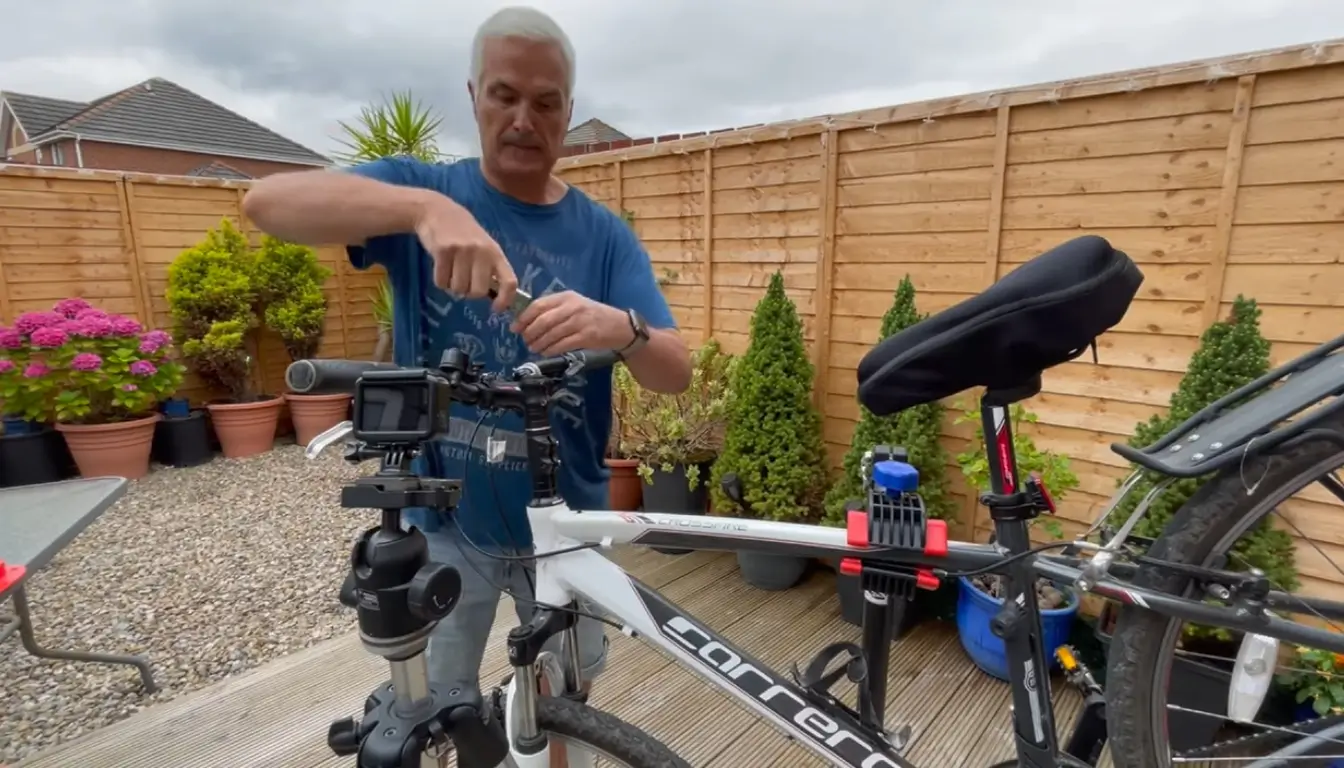
Raising handlebars with a threadless headset system is very simple. You will need an Allen key to remove the bolt from the stem cap.
These bolts attach the handlebars with the stem. You don’t have to remove all the bolts. Remove the larger bolt with the Allen key fully and keep it aside.
Next, concentrate on the stem cap; to remove the handlebars, it also needs to be removed.
So, remove the stem cap too and move forward to the small bolts. Don’t be so hurry; you don’t need to remove the small bolts. Lose them enough that it is necessary to release the grip and bring out the handlebar.
Be a little gentle, and pull the handlebars. Now adjust the handlebar height as per your need. If the stem doesn’t have enough height you need, you can add extra spacers to increase the height. These spacers are easily removable; if you need to remove the extra spaces in the future, you can do so.
After you adjusted the height as you desired, rearrange everything like it was before. Attach the stem cap and handlebars, tight the two small bolts and then put the large bolts. At this time, you don’t need to use any tools or even the Allen key, you can do it with your hands, and that is more preferable.
Wait for a little it’s not yet done. Ensure the handlebar is adjusted with the centerpiece and aligned with the front wheel perfectly. Remember, the wheel and handlebars need to be inline unless you can’t control the turning properly.
Now ride the bike a little, go a little back and come forth; if you need to struggle to do movement, loosen the two small bolts a little and tight the larger one. Give a recheck of everything and ensure all are in their appropriate position.
Raising Handlebars With A Threaded Headset System
As we said above, a threaded headset system handlebar means it has a continuous metal piece that connects the handlebar with the threaded headset system. This type of headset doesn’t found a lot in modern mountain bikes. Most old bike with single-speed or fixed gears comes with a threaded headset system. However, let’s move forward and know how to raise this type of handlebar.
With this headset system, the stem will have only one bolt that too on the top. To raise the handlebar, you have to loosen this top bolt. And as we used Allen Key while raising the previous handlebar, we will use the same one this time too. But we don’t have to remove this top bolt fully as we have done before. We can simply loosen it or remove it too if you want. After the bolt, it’s time to loosen the locknut. Use a wrench to complete this task. When the stem is loosened too, you can now move the handlebar and increase its height as you want. At this step, you may see some grease on its stem, but don’t be afraid; it’s just the excess of the grease; you can clean them or let them stay, it won’t cause any problem. In fact, grease helps the stem to move.
Now, if the handlebar height is what you wanted, then secure the locknut by tightening enough. After the locknut is tight, it’s time to tighten the top bolt and hex key. But remember what we said earlier, you should do it with your hand, so you don’t face any problem in the near future while loosening it.
Adjusting The Handlebar Angle
This is the easy option to raise the handlebar. But it can’t be done on any mountain bike and is only applicable if you want to raise the handlebar slightly. As I have said, you can’t use this trick with all mtb bikes; if the mtb bike is adjustable only, then you can do this. An adjustable mtb bike has a single bolt where the stem and frame meet each other. Use the Allen key and loosen this bolt.
After finding the right angle and meeting the height, you tighten the screws and the bolt. That’s all; the bike is ready for a ride. But before going on a long ride, why not give a test ride. It will help you to find if there is any problem available.
Final Thought
Yes, you can raise the handlebars on a mountain bike, and I’ve explained how to do it step by step. I also talked about different types of handlebars and which ones work best for different bikes. There are three ways to raise your handlebars. If your bike has a threadless headset, follow the steps I shared above. If it has a threaded headset, don’t worry you can raise those too, and I showed you how. I also covered bikes with adjustable head angles that allow slight handlebar changes. If you still have questions, feel free to leave a comment or contact me by email.

I am Ryan Ford, a mountain biking enthusiast who loves to explore the outdoors. I also like to go on adventures with friends and anything else that involves being outside. I love my bike because it gets me out of the house and gives me an opportunity to enjoy nature.