
To get the best ride possible when setting up your mountain bike, you must know how to set the bar angle on a mountain bike. Both comfort and performance are significantly impacted by the angle at which your handlebars are positioned. Better control, less strain on the arms and shoulders, and better riding posture are all made possible by a well-set bar angle.
Finding the ideal bar angle can significantly improve your cycling experience by maximising handling and comfort, whether you’re travelling on easy roads or difficult terrain.
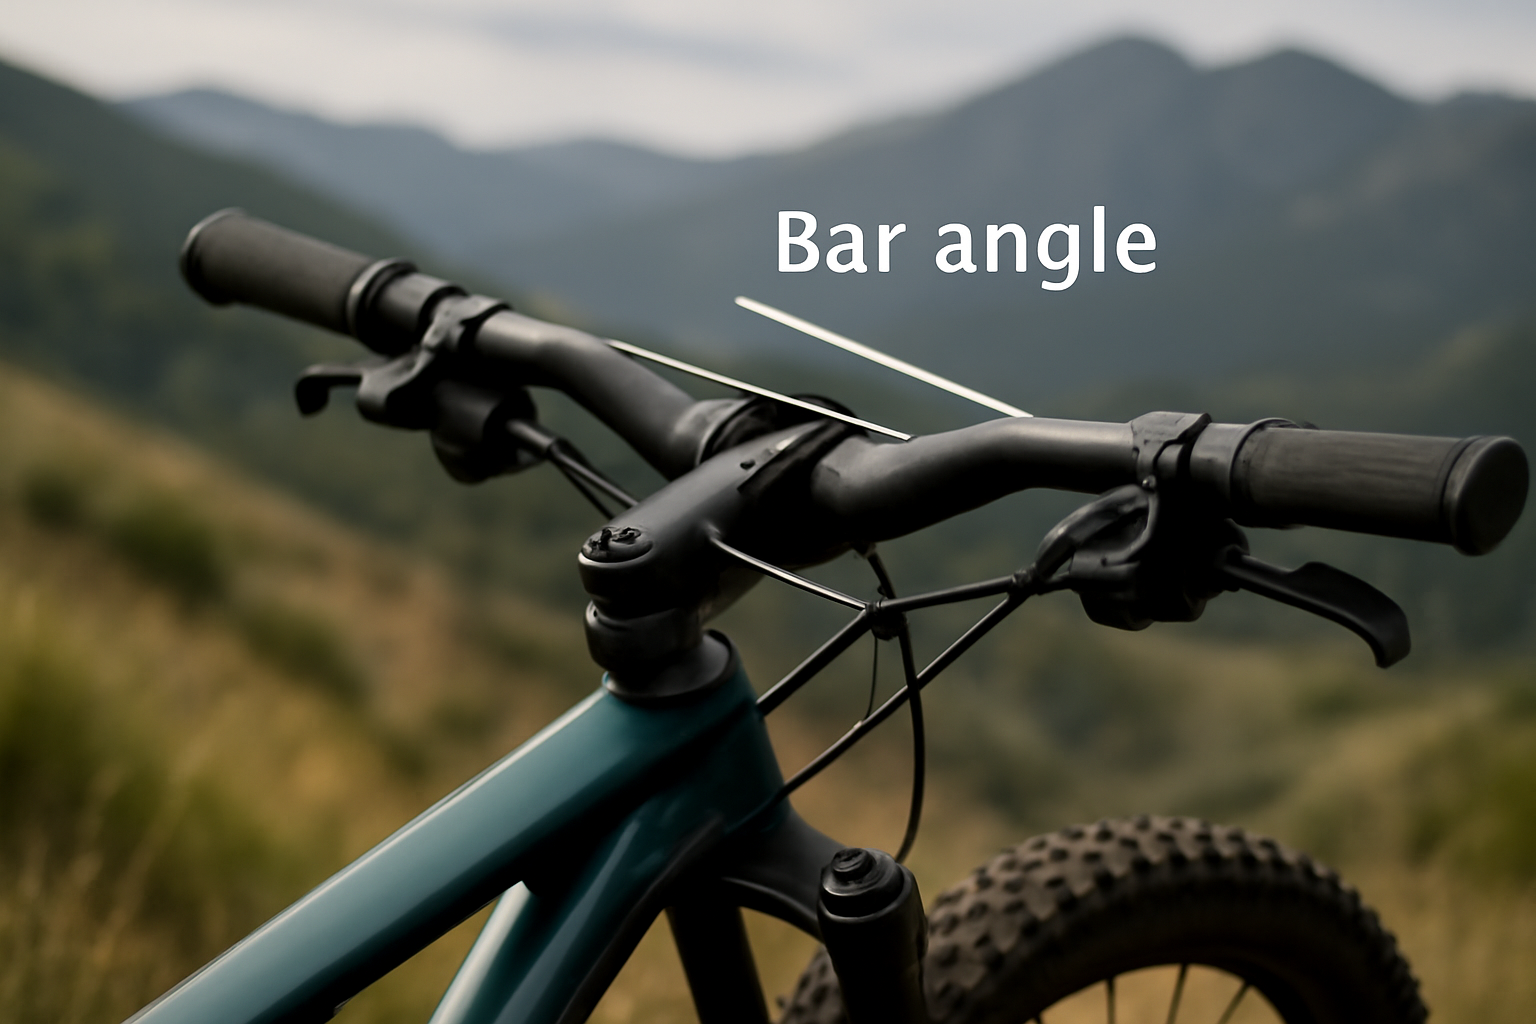
2. Understanding Bar Angle and How It Affects
The bar angle affects your riding position, handling, and overall feel, and even a small change can make a big difference in your life on the road. With the handlebars in level position, your body is more comfortable and your handling is more competent.
A steeper angle can result in an aggressive position, well-suited to technical riding, whereas a less aggressive angle can minimize arm and back strain for distance or cross-country use.
Achieving it right is vital to both performance and comfort, and therefore bar angle adjustment is one of the most crucial aspects of your bike setup.
3. Equipment Necessary to Regulate Bar Angle
Before you make any adjustment in bar angle, have ready the tools that you will use, which may involve a wrench, possibly a torque wrench, and an alignment tool or level for precision. A regular wrench will do in loosening stem bolts securing the handlebars, but a torque wrench will bring the guarantee that the bolts are tightened to spec without over-tightening or under-tightening.
Utilize a level or an alignment tool to help you determine the perfect bar angle by aligning the handlebars. Having them within reach will allow for easier adjustment and make it safe and precise.
4. Finding the Ideal Bar Angle Suitable for Your Riding Technique
Your riding style, terrain, and personal preference will influence the ideal bar angle. Downhill cyclists might opt for a steeper bar angle to achieve a lower and forward-raked position, offering greater control on steep, technical trails. Cross-country riders might find an upright bar angle ideal, offering comfort during longer rides. It also varies with the type of terrain; technical trails can require a more accurate setup, while smoother terrain allows you to maintain a more comfortable angle.
Ultimately, the correct angle should be natural and allow you to remain comfortable and in control.
5. Step-by-Step Guide on How to Adjust the Bar Angle
Just follow these simple steps to adjust the bar angle to your specifications, giving you the perfect fit for comfort and control. Start by loosening the stem bolts that secure your handlebars without removing them. After loosening the bolts, you can turn the handlebars to ride at any angle you choose. Ensure you align the bars to your natural riding position.
After adjustment, close the bolts securely with a firm torque in mind so that they are securely tightened to the correct torque specifications. This will help you get the best fit for your mountain bike.
5.1 Loosen the Stem Bolts
- Locate the proper tool: Use the correct wrench that fits the stem bolts appropriately. Usually, it is either a 4mm or 5mm Allen wrench.
- Loosen, not remove: Loosen the bolts but do not remove them. This permits the rotation of the handlebars but leaves the stem still connected to the bike.
- Avoid over-tightening: Do not over-tighten when loosening, as this will strip the threads. Loosen only enough to allow the rotation of the handlebars.
Support the handlebars: Hold one handlebar using one hand while loosening in order to prevent it from shifting too soon.
5.2 Adjust the Angle
- Check your riding position: Position the handlebars in a manner so that your arms are slightly bent when gripping the bars, neither too stooping nor too stretched out.
- Set the necessary angle: Depending on how you ride, position the handlebars at the appropriate angle. A lower angle will put you in an aggressive position, while a higher angle gives a relaxed, upright position.
- Make small adjustments: Start with small adjustments to avoid overcorrecting, since a small angle adjustment impacts comfort and control.
Test alignment: Ensure handlebars are level with the front wheel to guarantee proper bike handling.
5.3 Tighten the Stem Bolts
- Check the torque specification: Tighten bolts to the recommended torque value specified by the manufacturer, usually in the bike manual or etched onto the stem.
- Tighten gradually: Tighten each bolt slowly in a diagonal across the stem bolts pattern to distribute the pressure evenly.
- Check the position again: Double-check before tightening that the handlebars remain at the proper angle and in the proper position.
Check again after tightening: Check after tightening for any play of the handlebars. If they play, repeat the procedure slowly.
6. Testing and Fine-Tuning the Bar Angle
After you’ve made the adjustment in the bar angle, take a short ride to check it out and make adjustments if necessary. You’ll know in a short ride whether the handlebar angle gives you just the right balance of comfort and control. Pay attention to your arms, back, and shoulders as you ride. If you notice any pressure or stress in handling the bike, try to make some minute adjustments to the bar angle.
Adjusting in small steps is imperative in reaching the optimal setting that fits your manner of riding and personal preference in order to achieve the optimal riding experience.
7. Common Mistakes to Be Avoided in Making Bar Angle Adjustment
The majority of bikers make some general mistakes in the alignment of the bar angle, such as having it too high or too low or even failing to check if it’s aligned with the stem of the bike. Failure to check if the handlebars are level with the front wheel is a prevalent mistake leading to misalignment and bad handling.
Another problem is positioning the bars at an extreme angle, too high or too low, causing discomfort or compromising control. Avoid doing this by adjusting small and verifying everything is tightened and aligned securely prior to riding on trails.
8. How Bar Angle Affects All Types of Mountain Biking
The ideal bar angle will vary immensely based on cross-country, downhill, or trail biking, each requiring varying handling. For cross-country riding, a more neutral bar angle where the bars are level or ever so slightly tilted upwards is usually optimal for comfort on longer rides.
Downhill mountain bikers can utilize a steeper bar angle, with the bars tilting downwards to enhance control when descending steep, technical terrain. Trail riders prefer a balanced bar angle with equal provision for climbing on the way up and descending on the way down. Adjustment of your bar angle based on your specific kind of riding is crucial in order to realize optimal performance.
FAQ’s
1. Why is the bar angle on a mountain bike so crucial?
The bar angle is crucial because it affects your riding position, comfort level, and handling. An adjusted bar angle will relieve tension on your arms, shoulders, and back, as well as improve your handling and riding experience. It will also place you in an ideal position for long rides and technical courses.
2. How do I know whether my mountain bike’s bar angle is correct?
To test whether your bar angle is right, examine how you feel when you ride. If your wrists or arms are over-stretched or bent too much, the angle can be adjusted. You need to feel comfortable in control of the bike without taking a toll on your wrists, shoulders, or your back. A test ride once you have done some adjusting will determine it’s perfect.
3. Do I need to use special tools to make adjustments to the bar angle?
While some minor tuning can be achieved with a simple wrench, it is best to utilize a torque wrench for precise tightening in order to avoid damage. You may also need a level or alignment tool in order to get proper angle adjustment, especially for more sophisticated setups.
Conclusion
By tweaking your bar angle, you can adapt a configuration to increase comfort, control, and efficiency on the trails. Experiment with various angles to find which suits your riding style, terrain, and physiology. Small changes can produce large variations in how you’re feeling on the bike, whether hitting hard trails or cruising for vistas. Don’t be afraid to adjust while you’re riding and get used to the new setup.
Finding that ideal fit won’t just add to the enjoyment of rides, but will make your total mountain biking experience even better.

I am Ryan Ford, a mountain biking enthusiast who loves to explore the outdoors. I also like to go on adventures with friends and anything else that involves being outside. I love my bike because it gets me out of the house and gives me an opportunity to enjoy nature.